Map Hiking Trails: Unlocking the secrets of the wilderness starts with understanding your map. From paper to digital, navigating the trails requires more than just a compass; it’s about mastering the art of interpreting terrain, elevation, and points of interest. This guide delves into the intricacies of map reading for hikers of all skill levels, equipping you with the knowledge to plan safe and rewarding adventures.
We’ll explore various map types, their pros and cons, and the crucial information they convey. Learn how to create your own hiking trail maps, using professional software and techniques. Master compass and map navigation, avoiding common pitfalls, and discover how to plan hikes with precision. We’ll also touch upon the legal and ethical aspects of trail mapping, ensuring responsible and sustainable exploration.
Creating Hiking Trail Maps

Crafting compelling hiking trail maps is crucial for attracting adventurers and ensuring their safety. A well-designed map provides crucial information at a glance, transforming a potentially daunting trek into an enjoyable and manageable experience. This involves careful planning, precise surveying, and the skillful use of mapping software.
Sample Hiking Trail Map
Imagine a map depicting the “Eagle Peak Trail,” a moderately challenging 8-mile loop. The map would showcase a winding trail line, clearly indicating elevation changes through contour lines. Steeper ascents and descents would be represented by closely spaced contour lines, while gentler slopes would show wider spacing. Points of interest, like a scenic overlook marked “Eagle’s Nest Vista” or a rushing stream labeled “Silver Creek Crossing,” would be clearly indicated with relevant symbols.
The map’s legend would define these symbols, and a difficulty rating – in this case, “Moderate” – would be prominently displayed. The map’s scale would be clearly stated, allowing hikers to accurately gauge distances and plan their journey accordingly. Finally, the map might include a compass rose for orientation and perhaps a simple elevation profile chart showing the overall elevation gain and loss along the trail.
Surveying and Mapping a New Hiking Trail
Creating a new hiking trail map begins with meticulous surveying. This involves using GPS devices to record the precise coordinates of the trail’s path, including significant points of interest and changes in elevation. Surveyors often use specialized mapping-grade GPS units for higher accuracy. These devices record not only latitude and longitude but also elevation data. Additionally, surveyors might employ techniques like pacing and compass bearings, particularly in areas with poor GPS reception.
The collected data is then imported into mapping software, where it’s refined and processed to create a digital representation of the trail. Photographs are frequently taken to document trail features, providing visual context for the map. Finally, the digital map undergoes a rigorous review process to ensure accuracy and clarity before being published.
Software and Tools for Creating Hiking Trail Maps
Several software options exist for creating professional-looking hiking trail maps. Popular choices include ArcGIS, QGIS (both powerful Geographic Information System software), and specialized trail mapping applications like Avenza Maps. These programs allow users to import GPS data, create custom map symbols, add labels and text, and incorporate elevation data to generate contour lines. Additional tools might include photo editing software for enhancing trail images, and graphic design programs for creating aesthetically pleasing map layouts.
The choice of software depends on the user’s technical skills and the complexity of the map being created. For example, ArcGIS offers advanced geospatial analysis capabilities, while QGIS is a free and open-source alternative suitable for less complex projects.
Hiking Trail Map Symbols and Their Meanings
A standardized set of symbols enhances map readability. For instance, a solid black circle might represent a campsite, while a shaded area could depict a forest. A simple water droplet symbol signifies a water source, like a spring or stream. A mountain peak icon indicates a summit, and a winding brown line represents the trail itself. Trail markers, such as blazes (painted markings on trees), could be indicated with small, colored squares along the trail line, corresponding to the color of the actual blazes.
A symbol for a steep incline, perhaps a series of closely spaced diagonal lines, and a symbol for a less steep slope, maybe a single diagonal line, would further clarify the terrain. The legend of the map provides a clear explanation of all symbols used, ensuring that hikers can easily interpret the map’s information.
Legal and Ethical Considerations
Creating and distributing hiking trail maps, while seemingly straightforward, involves navigating a complex landscape of legal and ethical considerations. Ignoring these aspects can lead to legal trouble, environmental damage, and ultimately, a negative impact on the very communities and natural spaces you aim to serve. This section clarifies the key legal and ethical responsibilities involved in trail mapping.
Legal Requirements for Creating and Distributing Hiking Trail Maps, Map Hiking Trails
The legal framework surrounding hiking trail maps varies depending on location. In many areas, publicly accessible trails are mapped and maintained by government agencies, and using their data for commercial purposes may require permission or licensing. Private land requires explicit permission from landowners before mapping trails that traverse their property. Copyright laws protect the intellectual property of map creators; using someone else’s map without permission is copyright infringement.
Additionally, consider liability. Inaccurate maps could lead to accidents, potentially resulting in lawsuits against the map creator. Thorough research and adherence to relevant laws are crucial. Always obtain necessary permissions before publishing any maps, especially those incorporating data from other sources. Consult with legal counsel if you’re unsure about specific regulations in your area.
Ethical Considerations of Mapping and Using Trails
Beyond legal compliance, ethical considerations are paramount. The environmental impact of increased trail usage must be carefully considered. Overuse can lead to soil erosion, damage to vegetation, and disturbance of wildlife. Responsible map creation and distribution should include information promoting sustainable trail use. Furthermore, the privacy of landowners and individuals who live near trails should be respected.
Avoid publishing details that could compromise their security or lead to unwanted disturbances. Respecting the cultural significance of trails, especially those with historical or indigenous importance, is also vital. Consider working with local communities and indigenous groups to ensure maps accurately reflect the cultural context and avoid causing offense.
Ensuring Responsible Use of Hiking Trails
Promoting responsible trail usage is crucial for the long-term sustainability of these valuable resources. This involves educating users about Leave No Trace principles and best practices. Maps should clearly communicate information about trail difficulty, potential hazards, and appropriate gear. Promoting responsible disposal of waste, respecting wildlife, and minimizing environmental impact are key aspects of this education. For instance, a map could clearly indicate water sources and suggest methods for water purification to reduce the impact of water collection on sensitive areas.
Another example would be highlighting areas prone to erosion and recommending alternative routes to minimize environmental damage. Encouraging users to report trail damage or maintenance needs is another important step in responsible trail stewardship.
Responsible Trail Usage Guidelines
Always stay on marked trails to minimize environmental impact.
Pack out everything you pack in; leave no trace behind.
Respect wildlife; observe from a distance and never feed animals.
Be aware of fire dangers; follow all fire regulations.
Yield to other trail users; be courteous and respectful.
Report any trail damage or maintenance needs to the appropriate authorities.
Learn about Leave No Trace principles and practice responsible recreation.
Illustrative Examples of Hiking Trail Maps: Map Hiking Trails

Creating effective hiking trail maps requires a nuanced understanding of visual communication and the needs of different user groups. A well-designed map can transform a potentially confusing experience into a safe and enjoyable adventure. The following examples demonstrate how visual elements can convey crucial information clearly and concisely.
Challenging Mountain Trail Map
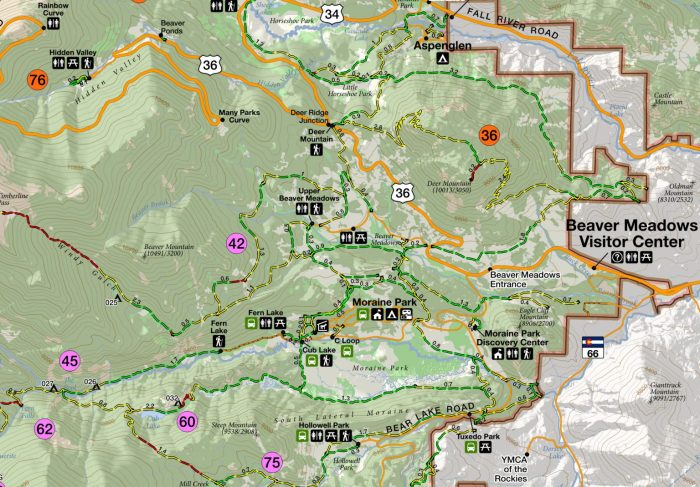
Imagine a map depicting a challenging ascent of a mountain peak. The scale would be relatively large, showing detailed contour lines closely spaced together to represent the steep inclines and rocky terrain. These contour lines would be brown, indicating elevation changes. Areas of dense forest would be shown in dark green, contrasting with lighter green for sparsely vegetated slopes.
Water sources, crucial for hikers, would be clearly marked with blue symbols representing streams or lakes, and potentially elevation information alongside. Trail markers, perhaps numbered sequentially, would be depicted along the path, providing a sense of progression and aiding navigation. Significant landmarks, like rocky outcrops or viewpoints, could be illustrated with small icons or labels. The map’s legend would clearly define all symbols used, including a scale bar indicating distance.
This detailed representation would provide hikers with a comprehensive understanding of the challenges and resources they’ll encounter.
Family-Friendly Nature Trail Map
In contrast, a map for a family-friendly nature trail would present a simpler, less daunting visual experience. The scale could be smaller, focusing on a wider area with a less intricate depiction of terrain. Elevation changes would be minimal, indicated by gently spaced contour lines, or perhaps omitted altogether if the trail is largely flat. Vegetation would be represented by a uniform light green, signifying a relatively open and easy path.
Landmarks, such as benches, picnic areas, or points of interest, would be clearly marked with intuitive icons, such as a picnic table symbol or a picture of a bird for a birdwatching spot. The trail itself would be a wide, clearly defined line, suggesting an easily navigable path. The overall impression should be one of calm and accessibility, reassuring families of a safe and enjoyable walk.
Multi-Trail System Map
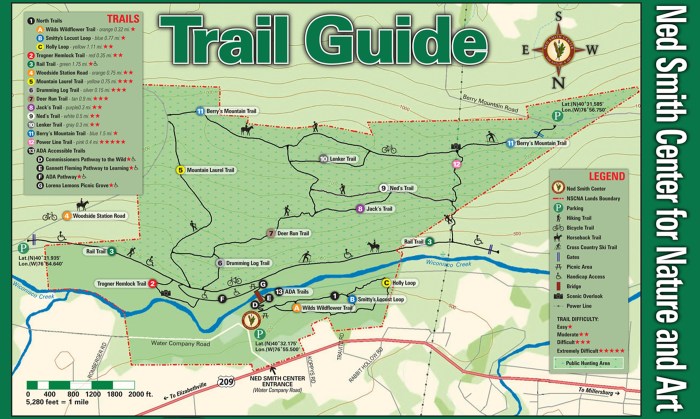
A map illustrating a trail system with multiple interconnected trails and loop options requires a strategic approach to visual organization. Different trails would be represented by distinct colors or line styles, perhaps solid lines for main trails and dashed lines for less prominent ones. Each trail would be clearly labeled with its name and distance, and perhaps a difficulty rating (easy, moderate, challenging).
Junction points where trails intersect would be clearly indicated, allowing hikers to easily plan their route. Loop options would be visually distinct, perhaps using a circular arrow symbol to denote the route. The map’s layout should be intuitive, using clear labels and a logical arrangement of trails to avoid visual clutter. A legend would be essential, providing a key to the different trail colors and symbols.
This comprehensive representation enables hikers to choose a trail that matches their skill level and desired distance, exploring various parts of the trail system with confidence.
Mastering map hiking trails isn’t just about reaching your destination; it’s about appreciating the journey. By understanding the nuances of trail maps, from interpreting symbols to planning your route, you unlock a deeper connection with the natural world. This guide has provided the foundational knowledge; now, it’s time to embrace the adventure and explore responsibly. Remember to always prioritize safety and leave no trace, ensuring these trails remain accessible and enjoyable for generations to come.

